IBM Contributes Kestrel Threat Hunting Tool to OASIS Open Cybersecurity Alliance (OCA)
June 29, 2021
Practicing Backward And Forward Tracking Hunts on A Windows Host
July 26, 2021In this blog post, the first in a series introducing the Kestrel Threat Hunting Language, we will show you how to get started with your first hunt. You’ll learn how to set up your environment, connect to data sources, and search for a common attack technique, scheduled tasks in Windows. You’ll also become familiar with the basic concepts that you can use to build your own huntbooks. The Windows Scheduled Tasks Huntbook created from this blog can be downloaded from the Kestrel huntbook repository.
Let’s setup our monitoring stack and perform a Kestrel hunt for persistent Windows threats by reasoning over Scheduled Windows Tasks.
Kestrel Installation
First, we will follow the Kestrel Installation Guideline and install Kestrel in a Python virtual environment on a Linux hunting box with Python 3.9.
Next, create a clean Python virtual environment and activate it:
$ python -m venv huntingspace
$ . huntingspace/bin/activate
Next, install Kestrel runtime with its Jupyter notebook kernel:
$ pip install -U pip setuptools wheel
$ pip install kestrel-jupyter
$ python -m kestrel_jupyter_kernel.setup
This step will install all Kestrel runtime components and dependencies such as STIX-shifter as well as Jupyter Server to use the Kestrel kernel.
Setting up Data Sources
Most organizations use an EDR to monitor their Windows hosts and collect telemetry data over we can use use Kestrel to reason. In this demo we will use Sysmon and use winlogbeat to stream events into Elasticsearch for log management. Logs in Elasticsearch are records, on top of which Kestrel provides an abstraction to do entity-based reasoning and enables dynamic huntflow development and sharing.
Kestrel connects to data sources with an extensible set of interfaces. The primary one we will use today is the STIX-shifter interface. STIX-shifter enables data retrieval from various data sources, including data in Elastic Common Schema (ECS) stored on an Elasticsearch server (used by winlogbeat). STIX-shifter has dozens of connectors that are not installed by default—users need to choose which connectors to install based on their available data sources. Let’s install the connector for our Sysmon-Elasticsearch(ECS) data pipeline:
$ pip install stix-shifter-modules-elastic_ecsOften, one would monitor many Windows with logs stored in Elasticsearch. Usually, people assign different Elasticsearch indexes for logs from different hosts monitored to query them individually. In Kestrel, we add and configure data sources we would like to connect to when we are performing our hunts. Each configuration specifies one or more monitored Windows host(s), which is identified by the Elasticsearch indexes. The configuration also tells Kestrel how to access the Elasticsearch service with hostname and credentials, such as passwords or API keys.
We open a new terminal, activate the Python virtual environment with Kestrel, and export three environment variables to setup a Kestrel data source named host101 (more information can be found at Kestrel tutorial:
$ . huntingspace/bin/activate
$ export STIXSHIFTER_HOST101_CONNECTOR=elastic_ecs
$ export STIXSHIFTER_HOST101_CONNECTION='{"host":"elastic.securitylog.company.com", "port":9200, "indices":"host101"}'
$ export STIXSHIFTER_HOST101_CONFIG='{"auth":{"id":"VuaCfGcBCdbkQm-e5aOx", "api_key":"ui2lp2axTNmsyakw9tvNnw"}}'
Starting Jupyter And Create A New Huntbook
Next just start Jupyter notebook in the above terminal with our Kestrel data source configuration (exported environment variables):
$ jupyter notebookOn the Jupyter page in a browser, we create an empty Kestrel huntbook by choosing the Kestrel kernel under the dropdown menu of New Notebooks.
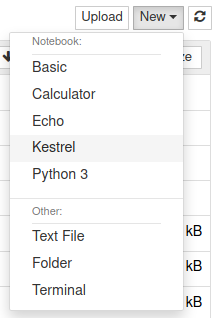
A Kestrel huntbook is a Jupyter notebook that contains hunting steps (in Kestrel), the execution results, and documentation or comments (in Markdown). In each notebook cell, we can put any number of consecutive Kestrel statements/commands to be executed together, which forms a Kestrel code block. After executing each cell, the Kestrel runtime will give a summary of new variables created in that cell and statistics on associated logs/records retrieved and cached by the runtime. Notebook cells can be re-executed or executed out of order in the notebook. Jupyter will give an execution ID to the left to the cell to indicate the execution order of cells. Note that if one or more Kestrel variables in a cell depend on the execution of another cell, the dependent cell or code block needs to be executed first, or Kestrel will give an error that the variable does not exist in the current session. Check out the Jupyter Notebook documentation for more details on the Jupyter environment.
Getting The List of Windows Schedulers
In this hunt, we will start drilling down from the list of Windows scheduled tasks/services to hunt persistent threats like
FIN7. In recent Windows (>= Windows 10 version 1511), scheduled tasks are executed and managed by svchost.exe
with a specific argument -k netsvcs -p -s Schedule. Tasks are spawned from the svchost.exe processes as child processes at scheduled time. This understanding written by Nasreddine Bencherchali in his blog provides the idea to retrieve Windows scheduled tasks as process entities with the parent process svchost.exe.
In Kestrel, we use the GET command to retrieve data from a data source that matches a given pattern. In this hunt, we are using STIX Patterns since the data source interface we are using is STIX-shifter, which translates a STIX Pattern into the native query language and translates the results back to STIX bundles for Kestrel to process.
There are two special items to take care of when writing a STIX pattern in Kestrel (more detailed in the GET command documentation):
- The returned entity type in the
GETcommand should always match the root-level STIX Cyber-observable Objects (SCO) type in the STIX pattern. - We need to give a time range with
START ... STOP ...for our first pattern. Otherwise, STIX-shifter will default the search for the last five minutes, which may not be the time range of interest.
To get the scheduler svchost.exe, the straightforward idea to get such process entities is to match processes with its specific command line using the following STIX pattern:
[process:command_line = 'C:\Windows\system32\svchost.exe -k netsvcs -p -s Schedule']And we can put the GET command in the first huntbook cell to execute:
# create Kestrel variable scheduler with the list of scheduler processes
scheduler = GET process FROM stixshifter://host101
            WHERE [process:command_line = 'C:\Windows\system32\svchost.exe -k netsvcs -p -s Schedule']
            START t'2021-04-03T00:00:00Z' STOP t'2021-04-04T00:00:00Z'
Alternatively, we can write a simpler pattern to match all svchost.exe processes and further filter the results by applying a second pattern on command_line.
# first GET going through STIX shifter
svchost = GET process FROM stixshifter://host101
          WHERE [process:name = 'svchost.exe']
          START t'2021-04-03T00:00:00Z' STOP t'2021-04-04T00:00:00Z'

# second GET running locally against the returned/cached data from the first command
# no need to specify time range for GET from a Kestrel variable, check doc for more info
scheduler = GET process
            FROM svchost
            WHERE [process:command_line = 'C:\Windows\system32\svchost.exe -k netsvcs -p -s Schedule']
Kestrel will run the first pattern via STIX-shifter and the second one locally against the return of the first GET. We put the two GET command in one code block since they will always run together. This might useful if we want to perform many searches on svchost.exe processes and minimize the queries we have to perform against the backend. Note that at the time of this writing the first approach will fail due to a bug in the ECS STIX-shifter module.
Finding Scheduled Tasks
Executing the above cell, we get 183 svchost.exe processes in variable svchost. Only two of them are scheduler processes captured in variable scheduler.

The next step is straightforward: finding the child processes of scheduler, which are the scheduled task processes we are interested.
For relationship resolution, we use Kestrel command FIND, which will take care of record-to-entity processing and prefetch related records for further drilling down.
To use FIND, we look up the command syntax for the appropriate relational syntax to use. The documentation also has some examples such as finding child processes of processes in a Kestrel variable, which is exactly what we need here.
tasks = FIND process CREATED BY scheduler
DISP tasks ATTR name, command_line
In the codeblock above, variable tasks contains the child processes from scheduler, and we use a display command DISP to show the key attributes of the process entities in tasks. For people who are not familiar with process entities, they can use INFO tasks command to print out all attributes and then DISP some of them.

The cell takes 8 seconds to run and find 126 task processes as child processes of the svchost schedulers in scheduler. The DISP command shows them in a table.
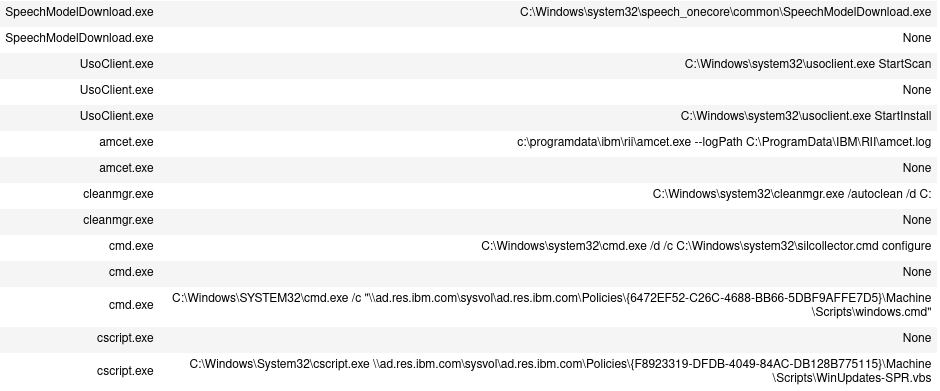
From the screenshot above (part of the processes in tasks), we see some unknown processes amcet.exe, yet we cannot find information on Google and VirusTotal.
Drilling Down on a Scheduled Task
We suspect acmet.exe is a legitimate IBM process because of the location path, c:/programdata/ibm/rii/amcet.exe shown above. We can create a new variable amcet with these processes via a GET command and investigate further.
We can find executable files associated with the processes using the FIND command but it may not give more information than what we already get from the command_line field. Instead, we can search through the child processes to see if there is anything suspicious, like PowerShell or other known malicious processes. Further, we can find any network traffic and analyze the communication patterns.
Let’s drill-down into amcet as a single execution block in our notebook:
# get only the amcet processes from all scheduled tasks
amcet = GET process FROM tasks WHERE [process:name = 'amcet.exe']

# find and display their child processes
amcet_child = FIND process CREATED BY amcet
DISP amcet_child ATTR name, command_line

# find and display their network traffic
nt = FIND network-traffic CREATED BY amcet
DISP nt ATTR dst_ref.value, dst_port
From the execution summary, we get 24 amcet processes, which spawn 45 child processes and establish 23 network connections.

All network traffic shares the same remote IP address 9.148.5.93 (shown according to our DISP nt command with attributes dst_ref.value and dst_port):

From our threat intelligence—look it up at the TI tool or enrich the entities with the TI information directly in the huntflow, which will be discussed in a future blog—we don’t see any sign of compromise of the host. We may check
the service on 9.148.5.93:443 to confirm this service is not compromised or malicious. What is more interesting at this moment are the child processes we found: 45 spawned processes fall into only two categories—conhost andpowershell—as our DISP command shows:
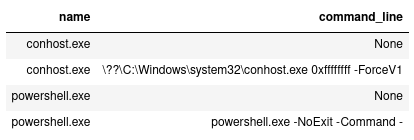
The sensitive process here is the conhost.exe with parameters 0xffffffff -ForceV1, which can access kernel space and is used in many attacks, especially DLL injection. We need to check the child processes and files used by all processes in amcet_child to get an idea whether something is tampered with or there are processes with suspicious command lines.
# find child processes of amcet_child
amcet_cc = FIND process CREATED BY amcet_child
DISP amcet_cc ATTR name, command_line

# find files read/written/executed by amcet_child
# Kestrel v1.0.8 only resolves the generic relation LINKED into STIX 2.0 references,
# which is limited to execution relation between processes and executables
amcet_f = FIND file LINKED amcet_child
DISP amcet_f ATTR name, parent_directory_ref.path
After executing this cell, we see no child processes created by any process in amcet_child (zero entity in amcet_cc).

There are only two files touched by the processes in amcet_child shown from the DISP amcet_cc command, which are just the main executables of the processes.

Summary And Stretch Hunts
In this blog post, we show how to get started with the Kestrel Threat Hunting Languages from instillation to your first hunt: discovering persistent threats in Windows. We start by finding all scheduled Windows tasks and then drill down
one specific process in search of suspicious activity. Although we didn’t find any persistent threat in the practice, we created a huntbook that can be reused and revised for future hunts. Checking the persistence of threats is usually one of the first phases of discovering large APT campaigns, and the composable huntflow capabilities enables reusing this huntbook large hunts. We only use the GET and FIND commands in this hunting practice, which covers one of the two
categories for knowledge codification—pattern matching. In our next blog we will cover not only pattern matching but also analytics, the combination of which will be extremely useful in larger hunts.


